Monday, November 25, 2013

Motor Neurons under the Microscope

Motor neurons are located in the central nervous system and are used to control muscles. Motor neurons carry signals from the spinal cord to the muscles to produce movement. Several categories classify motor neurons.
  • Somatic Motor Neurons - These originate in the central nervous system and project their axons to the target tissues, which are always skeletal muscles (involved in locomotion). Somatic motor neurons are involved in muscles that move limbs, abdominal or intercostal muscles.
  • Specialized Viceral Motor Neurons - These motor neurons directly innervate branchial muscles, such as gills in fish, muscles in the face and neck in land vertebrates.
  • General Visceral Motor Neurons - These neurons directly innervate cardiac muscles and smooth muscles of the arteries.

Biological microscope motor nerve image
Motor Nerve captured at 40x magnification.
The above image of a motor neuron was captured using the U2 Laboratory Microscope with a 40x APO Fluor objective lens.

Friday, November 22, 2013

Stereo Microscope versus Biological Microscope

What are the main differences between a stereo microscope and a biological microscope? Read on to find out...

Stereo Microscopes

  • Stereo microscopes offer lower magnification (usually somewhere between 5x-50x).
  • Stereo microscopes provide more room under the microscope for larger objects (think rocks, flowers, etc.).
  • Stereo microscopes have light above the stage, and sometimes also below the stage.
Stereo microscope diagram
S6 Stereo Zoom Microscope

Biological Microscopes

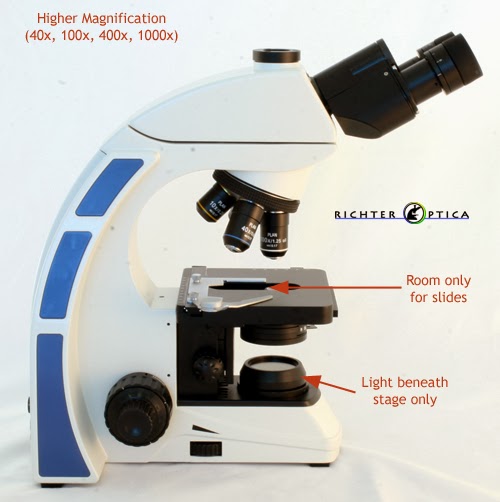
  • Biological microscopes provide higher magnification (40x, 100x, 400x, 1000x).
  • Biological microscopes only have room for slides under the microscope (no larger objects can be placed under an upright biological microscope.)
  • Biological microscopes have a light beneath the stage, therefore the specimen must allow light to pass it.
biology microscope diagram
U2 Biological Microscope

Tuesday, November 19, 2013

Animal Breeders and Fecal Analysis

Sheep and goat fecal analysis is an important component for goat farmers with worm and Coccidia infestations. Animal breeders including horses, rabbits, cats, dogs and cattle may also have these same issues. Worm and Coccidia parasites alone kill more goats than all other illnesses combined. A regular established program of microscopic examination of goat "pills" (feces) can help farmers find and treat parasites before they kill many of the animals.

Coccidia under microscope
Coccidia captured under a simple biological microscope.
Coccidia is a protozoan parasite. This protozoan causes Coccidiosis, which can be one of the most devastating diseases to livestock, particularly among young kids. Coccidiosis causes watery diarrhea that is sometimes bloody and can be life-threatening to young animals. The presence of Coccidia in the intestines does not mean the animal is actually suffering from Coccidiosis. The protozoans only cause disease when their numbers become so great that damage is caused to the host. The image above is Coccidia during the infective stage. The oocyst contains two sporocysts. 

Coccidia from a cat fecal sample. Photo: Joel Mills

This is a list of some species of Coccidia found in animals:
  • Eimeria - found in rabbits, poultry, sheep, horses, swine and goats
  • Toxoplasma - found only in cats
  • Isospora - found in dogs, cats, primates and swine
  • Neospora Canium - found in dogs
  • Sarcocystis - found in carnivores
Materials required to test for Coccidia Infestations include:
  • Simple biological microscope (400x magnification needed)
  • Blank glass slides
  • Cover slips
  • Cheesecloth
  • Test Tubes
  • Stir Stick (pick one up next time you get coffee)
  • Fecal floatation solution (you can use sugar or salt)
  • Test tube holding rack (you can use a styrofoam block with holes punched in it)
Fecal Analysis Procedure:

Mix up the flotation solution (it should be saturated, so you want to dissolve as much solid in the water as it will hold). Saturated salt solution requires a pound of salt in a little under 5 cups of water. Collect fresh feces using a small jar for each animal. Be sure to label with the date, time and animal. Place 3-4 goat pellets into a test tube and pour in just enough flotation solution to cover them. Stir and mix well with the stir stick. Strain with the cheese cloth to remove large particles and pour the strained liquid into a clean test tube. Fill up the test tube with more liquid so it reaches the very top. Place a cover slip over the top of the test tube and wait 30 minutes. Over time the eggs will float up to the top and adhere to the glass plate.

Carefully remove the cover slip and lower it at an angle over a microscope slide with the sample between both pieces of glass. Examine the specimen for worm eggs and Coccidia Oocysts. Start with the lowest magnification (40x) on the microscope and move up to 400x and if you have it, 1000x.

You should be able to identify Coccidia Oocysts, Nematode Eggs and Taperworm eggs. When performing a fecal count a general guide is that a level of about 500 eggs per gram of feces would indicate a next step of worming. If a regular testing system is in place (every 4-8 weeks is ideal) the best indication is when there is a dramatic increase in egg counts.

Thursday, November 14, 2013

Stereo Microscope versus Metallurgical Microscope

When do you need a metallurgical microscope versus a stereo microscope? Both of these types of microscopes offer reflected illumination, which means light will shine down from above the object, which makes it possible to view opaque specimens.

S2 Stereo Microscope Image
S2 Stereo Microscope with an LED Ring Light.

Stereo microscopes will typically offer anywhere from 7x-50x magnification - which is a relatively low magnification. At 40x magnification your field of view is made up of 5mm. If you need to view micron size particles you will need a metallurgical microscope.

Carpet Fiber Microscope Image
Carpet fiber captured at 7x magnification using the EMZ5 Stereo Microscope

Metallurgical microscopes have a light that shines down through the objective lens. Magnification is usually 40x or 50x, 100x, 200x, and 400x or 500x.

Motic BA210 Metallurgical Microscope Image
BA210 Metallurgical Microscope

200x Magnified Carpet Fibers
Same carpet fibers as seen above, but captured at 200x with a Metallurgical Microscope
If you have a solid object that does not allow light to pass through it, you will need either a stereo microscope or a metallurgical microscope in order to view your specimen in depth. Which microscope you need depends on the size of the particles you wish to view. Keep in mind that more magnification is not always better since it does reduce your overall field of view.

Friday, November 8, 2013

Kids Science: Colored Flowers!

This is a fun and easy kids science project that involves several parts.

Required Items:
6 White Carnations
5 Glasses or Vases
5 Different colors of food coloring
1 Low Power Dissecting Microscope

Step #1

Fill each vase or cup about 1-2 inches full of water and add some food coloring until the water is dark. Once you have five vases filled with colored water, place the stems of five carnations each in a different vase of colored water.

Step #2

Take the final white carnation and look at the petals under the stereo microscope. What do you notice? Draw a picture of the structure of the petal as seen under the microscope.

Photo Courtesy Brigham Young University


Step #3

How long did it take for your flowers to soak up the food coloring into the petals? If you are preparing a presentation for your science class include this information in your report. Take one petal off of each different colored flower and look at it through your microscope. Can you see the route that the flower used to "drink up the water" and how the color seeped into the petals? Unlike humans, flowers do not have kidneys to filter out the food coloring so the petals simply change color when they are placed in colored water. If you would like to share the colored flowers with your class, they will remain colored even once you remove them from the water.

Monday, November 4, 2013

Tips for Achieving the Best Possible Microscope Resolution

Biological microscopes provide high magnification and optimal resolution is key to viewing a high quality image. Follow these tips in order to achieve the best possible resolution from your light microscope.
  • Choose microscope objectives with the highest NA and correction.
  • Use only aplanatic or achromat substage condensers.
  • Use high magnification, corrected oculars consistent with viewing comfort and lighting conditions.
  • Use Kohler illumination.
  • Employ yellow-green filters, especially with achromat objectives, whenever possible.
  • Center the entire optical system and substage condenser.
  • Correct for improper coverslip thickness, or use only one of the prescribed thickness.
  • Use immersion oil of the proper characteristics and avoid bubble formation on the slide.
  • Adjust illumination for optimum used Numerical Aperture (NA) of an objective within its available NA.
  • Use high ambient light levels with high microscope illumination levels.
  • Maintain a high level of cleanliness of optical elements.
  • Recognize optical artifacts and, when possible, adjust conditions to minimize them.
  • Know the microscope through practice and manipulation with known test objects.
Want some further info about microscope resolution? You might find these books helpful:
  • McLaughlin, Robert, Special Methods in Light Microscopy, Microscope Publications Ltd., 1977.
  • Belling, John, The Use of the Microscope, McGraw-Hill, 1930.
  • Oliver, C.W., The Intelligent Use of the Microscope, Chemical Publishing Co. Inc., 1953.