Friday, February 26, 2010

Polarizing Microscope Colors

Minerals a rocks produce amazing colors. Using a polarizing microscope, Dr. Parvinder Sethi, Professor of Geology at Radford University captured these images of paper-thin slices of rocks with a 35mm film camera.

To prepare the rocks, Dr. Sethi used an industrial rock saw to cut a hand-sized piece of rock, then he trimmed it with an oil-cooled saw with a diamond blade. Once it was trimmed, a square piece of the rock was glued to a glass slide and cured with heat. Next, the slide was ground by hand until it was about 30 microns thick (barely visible to the naked eye).

All images were captured at 40x magnification. The images you are viewing on this page are about the size of the tip of your pencil!

Dr. Sethi does not utilize any color alteration tools when capturing the images. All images are exactly how they appeared under the polarized light microscope. 

Once Dr. Sethi captures the images, he develops the film by hand and then scans the images to the computer. Science and art become synonymous with Dr. Sethi's work.

Tuesday, February 23, 2010

Digital Stereo Microscope

The DC4-456H digital stereo microscope provides 10x and 30x magnification. The microscope hooks up directly to the computer through the USB port and comes with software. When the software is open on the computer you can view a live image from the microscope. This image can be captured and saved. Measurements can be made using the software as well.


This image of a soda can tab was captured at 10x magnification with the DC4-456H digital stereo microscope.

 30x magnification.

Monday, February 22, 2010

Science Project: Microscope Staining Cells

Since many cells are almost transparent under a microscope, it is sometimes necessary to stain them in order to view components of the cells. There are quite a few different types of stains available. You can view a list of the most common microscope stains here.

While many stains are advanced, below is a basic staining activity that you can try at home. There are several types of stains you can use at home including: food coloring, iodine, malachite green (ick fish cure), and methylene blue. You can purchase food coloring at a grocery store, iodine at a pharmacy, and the malachite green and methylene blue can be purchased at an aquarium store.

Certain stains will color different parts of a cell. Experiment with your own to see which part of the cell the different stains attach to. Make sure you have adult supervision - stains can be messy and not only will they color your specimen, but also your hands, the table, carpet, etc. Make sure you put plenty of paper underneath your work area and have some spare towels handy to wipe up any spills.

Science Project: Create a stained prepared slide of your cheek cells and compare this with an unstained prepared slide.

You will need the following items:
Gently scrape the inside of your cheek with the toothpick or Q-Tip to get some cheek cells. You do not need to press hard. Prepare two identical wet-mount slides by placing the cheek cells and one drop of water on each of the blank microscope slides and covering them with cover slips. 

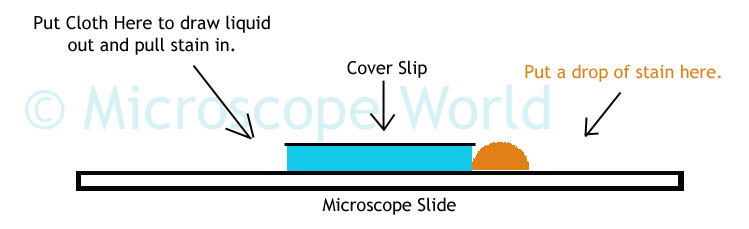
Set one of the prepared slides aside and with the other prepared slide apply the staining material. The image below shows how you can pull the stain into the slide. Place your drop of stain on one side of the cover slip and use a paper towel to pull the liquid out of the other side of the cover slip. When the liquid is pulled out from the left the stain will be pulled under the cover slip from the right.


Take a look at each slide under the microscope. Do you notice differences in the details you can view in the cheek cells? Try the same activity above, but this time try a different type of stain. Make sure you document your science project and draw images of your cheek cells. You may want to share your findings with your classmates!

Thursday, February 18, 2010

Microscope Focusing Holders

A microscope focusing holder is used to connect a stereo microscope body to the microscope stand. If you have a stereo microscope body and would like to mount it to a boom stand, you will need to know two different measurements. #1. You need to measure the diameter of the body, to ensure it will fit in the focusing holder you are purchasing.

Above is a Meiji Microscope focusing holder, with inside diameter of 84.2mm, to accept an 84mm diameter stereo microscope body. This focusing holder is made to fit a 20mm arbor, or mounting post.


The #2 item you will want to measure is the arbor on your stand. The red arrow above is pointing to the arbor. If your arbor does not fit the focusing holder, you won't be able to connect your microscope to the stand.

 
A different type of microscope focusing holder uses a 5/8" pin mount (shown above) to connect to the microscope boom stand. This is a fairly universal size mount and increases the number of stands that a microscope body can be mounted to.


The articulating arm stand above can be purchased with several different sizes of arbors (mounting posts) or with no arbor, it could be used with the pin-mount focusing holder.

Wednesday, February 17, 2010

NIST Certified Stage Micrometers

Stage micrometers are used to calibrate eyepiece reticles. In many industries it is important to have a stage micrometer that is NIST certified. NIST (National Institute of Standards and Technology) is a measurement standards laboratory which is a non-regulatory agency of the United States Department of Commerce.

NIST certification provides documentation that the stage micrometer meets very specific measuring guidelines.

All of Microscope World's stage micrometers can be NIST certified. If you need a NIST certified stage micrometer please give us a call at 800-942-0528 and we will be happy to help you out.

Monday, February 15, 2010

Inverted Biological Microscopes

Inverted Microscopes have the light source and condenser above the stage, rather than beneath, while the objective lenses are found beneath the stage. On a compound high power upright microscope, the light source and condenser are beneath the stage, while the objective lenses are above the stage.

The image below of the Motic AE2000 inverted microscope gives you an idea of where some key components are located on an inverted microscope. Definitions for each of these microscope parts are listed below.
  • Objectives: The objectives provide magnification for viewing specimens. Total microscope magnification is a combination of the objective power and the eyepiece magnification. For example, if you are using a 10x objective and WF10x eyepieces, your total magnification is 100x.
  • Coarse & Fine Focusing: Allows you to fine-tune focusing for a crisp, clear image when looking through the eyepieces.
  • Trinocular Port for Camera: A port where either a digital SLR camera can be adapted, or a microscope camera, using a C-Mount Adapter.
  • Eyepiece with Diopter: The eyepieces are used to view the microscopic image. The diopter allows correction of dioptric differences between both eyes.
  • Long Working Distance Condenser: A condenser that has a longer working distance, allowing for larger specimens to be placed under the microscope. Working distance is the amount of space that must be between the specimen and the objective lens in order for the image to be in focus.
  • Phase Slider: Used to view items with phase contrast objectives.
  • Filter Holder: Filters (such as a daylight filter or a blue filter) are often used when capturing digital images to prevent hotspots, or to balance out colors for identification of different specimens.
  • Iris Diaphragm: Part of the condenser that helps to focus light on the specimen, the iris diaphragm controls the diameter of the light that passes through the condenser.
The main advantage of an inverted microscope is the ability to view live specimens in petri dishes (rather than squished between a glass microscope slide and cover slip). The petri dish provides the opportunity to keep specimens in their natural conditions, which can extend the life of the specimen and provide longer viewing opportunities. Additionally, rather than having a full phase contrast microscope, the phase slider can be used in place of staining. Staining can sometimes kill specimens, whereas phase contrast does not require the use of stains.


This is the Meiji TC-5300 inverted microscope. Similar to the AE21 microscope shown above, this microscope has a full phase contrast setup. The binocular version has a camera port where either a digital SLR or C-Mount camera can be adapted. The trinocular version would allow two cameras to be attached at the same time. The mechanical stage allows movement of the stage from left to right or forward and backward with the turn of a knob. This is often helpful at higher magnifications when it is easy to move the specimen right out of the field of view if a mechanical stage is not being used.

Friday, February 12, 2010

Microscope Mechanical Stages

Microscope mechanical stages allow you to maneuver your slide or specimen by turning a knob. By turning the knob, you can move the stage left to right or forward and backward. A microscope mechanical stage is not always necessary, but can make using the microscope much easier and less frustrating. When you don't use a mechanical stage it is easy to push your specimen right out of the field of view, especially at higher magnifications.


This is the MWSTG11 stereo microscope mechanical stage that fits in a 95mm stage plate holder. The glass plate on top allows light to pass through the stage if needed.

Each microscope mechanical stage allows you to move the stage very slowly while looking through the microscope. This ensures that you won't miss any details while scanning specimens. You can view more mechanical stages here.

Tuesday, February 9, 2010

Cloth Tape Fibers Under Microscope

Microscope World currently has a customer that manufactures duct tape. Duct tape has cloth fibers woven in it to make it strong. Part of the quality control involves analyzing and measuring some of these fibers.

This image was captured at 20x magnification. 
All images were captured using the DC5-420T digital stereo microscope

40x magnification was obtained using the 1.5x auxiliary lens on the stereo microscope.

The images with a black background vs. white background were simply obtained by flipping over the included black and white stage plate that comes with the microscope.

An eyepiece reticle was placed in the microscope eyepiece to make some basic measurements while looking through the microscope. If the fibers fell beneath a specific parameter a more detailed measurement was made using the software included with the digital microscope. This image was then saved with the measurement imposed on the image.

Thursday, February 4, 2010

DS-2 Digital Student Microscope

The Motic DS2 digital kids microscope has 20x and 40x magnification. The microscope connects directly to the computer and will allow you to view a live image on the computer with the included software. Capture and save images, make measurements and even create your own photo album.

This quarter was captured at 20x magnification with the DS2 digital microscope.

Monday, February 1, 2010

Ball Bearing Boom Stand

The microscope ball bearing boom stand is perfect for applications when you need to look at small parts and then would like to push the microscope body out of the way. The horizontal boom slides freely, making it easy to maneuver the microscope.